Private Scuba › Snorkeling Blog › Taking Underwater Photos
How to Take Underwater Photos
Following these snorkeling photography tips will help you learn how to take underwater photos while snorkeling in water.
We explain the basic steps required for taking pictures underwater while snorkel swimming – and the best process for getting stunning results!
Snorkeling Photography Tips and Advice
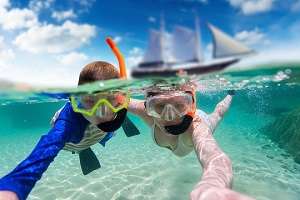
Combining snorkeling underwater photography and swimming is a challenge in many ways.
Nonetheless, it is a thoroughly rewarding experience that even those who don't know how to snorkel can still enjoy.
All you need is the right photographic equipment - and a little bit of snorkel photography know-how.
As a complete novice, you may be wondering how to take underwater photos while snorkeling? Or, you may be someone who is looking to accelerate and improve their own technique.
Snorkeling is an inexpensive relaxing pastime in most cases. It is an uplifting hobby that provides a way to see some of the diverse marine environment and its inhabitants.
Even so, you are unlikely to see anything in fine detail below a few metres of depth. That is, unless the water is incredibly clear or you know how to skin dive.
We hope this simple, yet informative section on snorkeling and water photography tips, will guide you forward. It aims to add some focus and a guiding light to your mission as we cover these important topics:
- Waterproof Sports Camera Solutions
- Diving Down for Best Composition Underwater
- Dealing with Poor Water Clarity
- Using Natural Sunlight: When and How
You will need a basic snorkelling set and the best waterproof camera for snorkeling that you can afford. Hence, the list of items needed to produce the best underwater photos is a short one.
First of all, you should try to acquire some rudimentary snorkel swimming skills – and have a relative comfort zone in water.
Doing so will help you before adding the extra awkwardness of a camera into the equation. It will tip the balance in your favour. Because, you can get stunning results when you know how to take underwater pictures of snorkeling imagery.
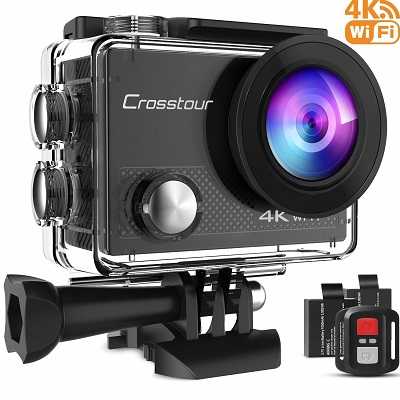
Best Underwater Camera for Snorkeling
You will need a camera for taking underwater photographs. There's no great surprise there. But, it does not need to be the most expensive or the best underwater cameras for snorkeling on the market.
 In fact, you can also buy cheap waterproof snorkeling cameras online through our snorkeling shop.
You might also decide to use an underwater housing for a non-waterproof camera that you already own.
Even so, it tends not to be the cheapest way to engage in some snorkeling photography.
You can also use some of the modern mobile phones nowadays. They guide you how to take pictures underwater (e.g. using a Dry Dock or waterproof phone case).
But, take care to learn its maximum operating depth to avoid a costly mistake.
A DSLR model is likely to get you the best imagery in the water. But you have the option of buying a fairly cheap waterproof snorkeling camera from as little as $100.
Underwater Photography Tip: It may surprise you to learn that most underwater sports cameras add buoyancy and drag. The majority of waterproof housings have positive buoyancy. Thus, they will float at the surface if you let go or lose your camera.
Composition: Framing and Shooting Fish
Choosing the best composition, and then finding the exact moment to frame the photo, is not as easy as many of the photographic books and videos suggest.
Most snorkelers find it easier to swim facing forward and downwards at the same time – you could call this a 45 degree angle.
The reason they swim this way is to keep the snorkel tube vertical and avoid unnecessary water entering inside the plastic tube. Nonetheless, facing this direction may not always be the best angle for good photo composition and lighting.
Here's the thing:
The best underwater compositional shot is almost always done from below or at the same level as the subject. So, shooting upwards towards the surface usually benefits from the natural sunlight that penetrates through the water.
Photographing marine creatures is often better done from the side – like wildlife photography above water. Shoot with a slight angle towards the viewfinder. Even so, we have seen some terrific results when the subject faced the camera front-on with an almost confrontational attitude.
Sometimes the only way to get the fish or subject suitably composed for the shot is by diving below sea level. As a result, snorkelers often use a weight system to assist their submergence when they are wearing a buoyancy vest or wetsuit.
Remember that doing so may create underwater pressure waves. That usually results in the creature you’re hoping to photograph darting away in the opposite direction.
Taking Snorkeling Pictures at the Surface
Snorkeling pics taken only from the surface will have limited composition. Often, they will lose a lot of the valuable background imagery. We do not recommend feeding fish to gain a better front end shot. But, often it is the only way to avoid a tail end photo.
Note that feeding fish can be dangerous and illegal in some countries. The best method of photographing creatures 'head on' underwater may be to anticipate its direction – and meet it by surprise. This option works quite well with large fish, sea turtles, and rays.
Split Level Snorkeling Pictures
A new and growing trend in snorkeling photos is taking split-water snorkeling images. It sounds more difficult than it really is. But you do need calm water, impeccable timing, and a steady hand to take the best split photography.
 It is worth noting that split level photography underwater usually makes the image appear bigger than the subject above water.
Even so, composing this challenging activity above and below the waterline shot makes you feel like a pro. It also improves your confidence.
Trying to avoid water drops sticking to the lens port is a common problem – and especially so when taking split shots.
Of all the snorkeling tips and tricks we offer in the blog articles, the one for eliminating the problem of underwater housing water droplets is mouth spit.
A quick smear of saliva, followed by a dunk in the water, usually works well. A thin film of water coats the lens and often works better than some commercial defogs.
Snorkeling Photography Tips: Many editing programs are free and easy to use. You can edit and improve your handy work by manipulating and adjusting the colour balance, and cropping or resizing. Also, use the rule of thirds principle. It is a guideline applying to the photographic position of an important subject.
 Underwater Photography Guide: Rule of Thirds Grid
The rule of thirds in photography suggests you should compose the subjects on imaginary lines.
The lines divide an image into nine (9) equal parts by two (2) equally spaced vertical lines and two (2) equally spaced horizontal lines.
Diving Down for Photographs
Possibly the biggest challenge for taking photos underwater is diving down under water to take photographs. This is when certified scuba divers have a huge advantage over snorkelers.
If you've already mastered surface skin diving, you will have more opportunities to photograph subjects up close. Even so, the time you have available to capture the creature's interesting behaviour will be very limited because staying deep down is rarely an option.
The other challenge is being able to see clearly through your mask, the housing, and then finally the viewfinder tunnel.
Sometimes snorkelers must accept that foggy snorkel masks and water droplets on the housing interfere with a perfect shot at the bottom of the ocean.
Can You Snorkel Underwater? Duck Dive Tips
Following these basic tips will help you make efficient 'duck dives' without excessive splashing and energy-sapping movements. Remember that duck diving is best when you use the 'one up one down' method. It's another reason why snorkeling with a buddy is safer and more fun.
You should be floating stomach-down before you duck dive. Take a good breath, hold it, and bend from your waist head-down. You should be around 90 degrees and perpendicular to the surface water level.
This step is important:
Pull downwards with your arms and try to lift your legs and fins in a feet-up high vertical position to help push you under water.
Following the 'Green Fins Friendly snorkeling guidelines' generally means you need to use less energy. Thus, it also avoids damaging the delicate corals and sea life animals.
Snorkeling Photography Tips
Find a spectacular background feature as a contrast. It could be a sea fan or a canyon. Then, wait for creatures to swim in view rather than chasing a fish around the reef. This will be an easier method than trying to catch it in the perfect background.
Add some depth by leading the viewer’s eyes from the foreground subject slowly to the background. For example, take a shot inside a huge barrel sponge. Or, photograph small animals near to larger creatures to show some size comparisons.
Dealing with Water Clarity
The top snorkeling destinations will have clear water. What’s more, water clarity is directly related to getting stunning quality post processing underwater photographs.
You can't wave a magic wand and instantly turn murky water into crystal clear underwater visibility. So, how do you deal with less than perfect water clarity for acceptable image quality?
Unfortunately our helpful photo tips while snorkeling do not include magic cures. Nonetheless, try to minimize your distance from the subject for clearer underwater photography. This is especially pertinent when the water is cloudy or has a lot of sediment.
The solution?
Try to get as close as possible before you click the shoot button. Another handy tip is to use a wide angle lens in conditions with less than clear water.
A useful tip for taking sharper snorkeling images is to try and avoid overusing the zoom function. Getting closer and reducing the volume of water between you and the subject usually reduces the amount of backscatter'. Thus, less gets reflected off suspended particles in the water (e.g. plankton blooms and sediment).
Using Natural Underwater Lighting
It is important to be aware that your shadow can ruin a good underwater shot. Hence, it can interrupt the natural underwater light source.
Natural lighting under water comes from sunlight. The colour spectrum is at its fullest near the surface. Even so, red colours disappear after a few metres of depth, followed by orange, yellow, green, and blue.
Thus, as you would learn in the PADI Snorkeling Photographer Certification, the best hours of the day to take pictures underwater is midday. This is when the sun is directly above the water.
Which leads us to...
You should also accept that surface waves cause diffraction. This can scatter the light in many different directions.
You do not need underwater lighting for taking pictures while snorkelling. But, you can increase the ambient light underwater using a strobe or the camera flash feature. This is especially useful if it is a cloudy day or you are in choppy seas.
Snorkeling Tips for Shallow Water Photography
Use bright sunlight for illumination instead of a flash or strobes in shallow water. Powerful strobes are likely to increase 'backscatter'. Artificial lighting is rarely needed by snorkelers photographing at midday when the sun is the brightest.
Note: Taking underwater snorkeling pictures is fun – but it can be a challenge at times. So, the best way to take underwater pictures is to shoot liberally and delete liberally.